Google Analytics 4: What It Is and How To Get Started

Google Analytics 4 (GA4) is a completely reimagined analytics platform – the biggest change to Google’s analytics product since its inception in 2005.
Even though there are exciting new features in the GA4 platform, for many, this change is daunting. Migrating to a new platform takes work and many are unsure of where to start.
This task is made even more daunting with an approaching deadline – on July 1, 2023, all standard Universal Analytics will stop processing data. For premium users of Universal Analytics 360, Google has extended the sunset date from October 1, 2023, to July 1, 2024.
(You can learn more about significant dates in this help file from Google.)
In this article, we will give a high-level overview of GA4 so you can get a better understanding of the changes that you can expect to see, and how to get started. Here are some quick links so you can jump to a specific section:
- What is GA4?
- Ways to get started with GA4
- Verifying and customizing your GA4 install
- Getting started with GA4 if you don’t have UA or Google Tag Manager
- FAQ: How do I migrate to Google Analytics 4 (GA4) from Universal Analytics, and what are the key differences between the two platforms?
What Is GA4?
Google Analytics 4 is not just an update to Universal Analytics – it’s a whole new platform.
GA4 was designed to meet evolving needs; website owners need to be able to track the customer journey across many channels and devices (like websites and apps). In addition, privacy is a growing concern.
Google says this of GA4:
It allows businesses to see unified user journeys across their websites and apps, use Google’s machine learning technology to surface and predict new insights, and most importantly, it’s built to keep up with a changing ecosystem.
Google goes on to point out some of the main differences between Universal Analytics and GA4:
Universal Analytics was built for a generation of online measurement that was anchored in the desktop web, independent sessions and more easily observable data from cookies. This measurement methodology is quickly becoming obsolete. Meanwhile, Google Analytics 4 operates across platforms, does not rely exclusively on cookies and uses an event-based data model to deliver user-centric measurement.
And though Universal Analytics offers a variety of privacy controls, Google Analytics 4 is designed with privacy at its core to provide a better experience for both our customers and their users.
When it comes to the nitty-gritty details, there are several ways that UA and G4 differ in how they collect data, and in the metrics reported. Let’s look at that next.
Data Model Differences
Let’s go over what we believe to be the most significant change to Google’s analytics in how it collects data: Events.
This change impacts everything from the way sessions are recorded to the way the reports are set up. In other words: It’s a fundamental change.
Events
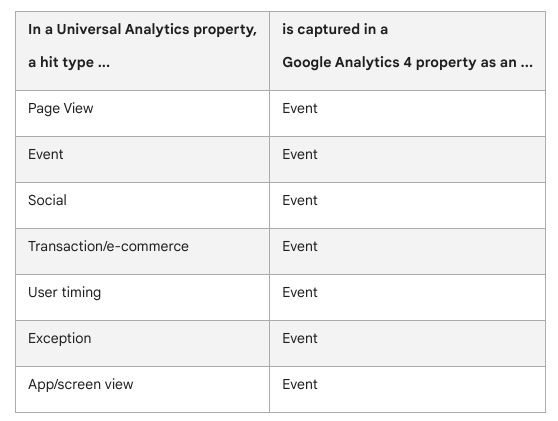
One of the biggest differences between UA and G4 is “events.” GA4 is based on the idea that any interaction (such as page hits, ecommerce hits, and social hits in UA) is an event. So in GA4, all the interactions are recorded as events.
Google explains:
A Universal Analytics event has a Category, Action, and Label and is its own hit type. In Google Analytics 4 properties, every “hit” is an event; there is no distinction between hit types. For example, when someone views one of your website pages, a page_view event is triggered.
Google Analytics 4 events have no notion of Category, Action, and Label and, unlike Universal Analytics reports, Google Analytics 4 reports do not display Category, Action, and Label. Therefore, it’s better to rethink your data collection in terms of the Google Analytics 4 model rather than port your existing event structure to Google Analytics 4.
Some of the old hit types in UA have been converted to GA4 events. For example, a page view hit would be converted to a page view event.
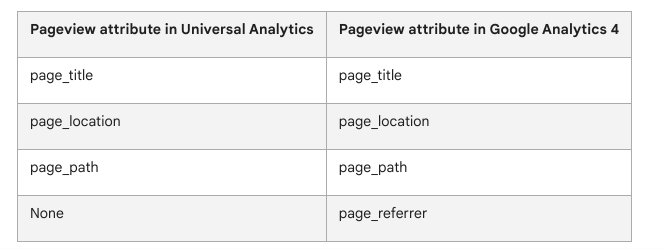
UA had report categories such as “Acquisition,” “Behavior,” etc. – all the associated reports were in those sections. GA4 doesn’t have that (for the most part).
For example, the data for the page views report in GA4 is in Engagement > Events > page_view.
Users will need to recreate some of those reports using event counts. If you want it to look exactly the same in GA4 as in UA, you need to create the report or use the Explorations option in GA4.
Metrics Updates
When it comes to metrics, there are a lot of little changes that will add up to a big change overall for tracking. Here are a few changes we think are significant:
- Sessions
- Engagement rate
- Conversions
Sessions
Sessions are counted differently in GA4 versus UA. For example, there isn’t a midnight cutoff for sessions in GA4 like UA had, and GA4 doesn’t start new sessions for users who come in from different campaigns.
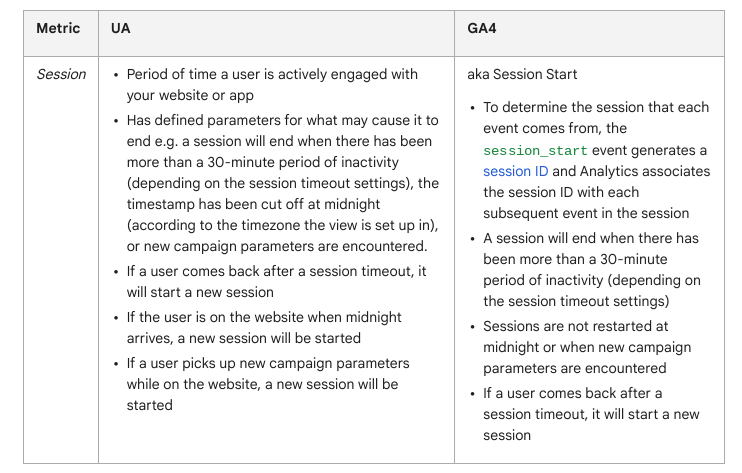
The statistical estimates that GA4 uses for sessions, however, should deliver higher accuracy and lower error rates in data reporting.
Engagement Rate
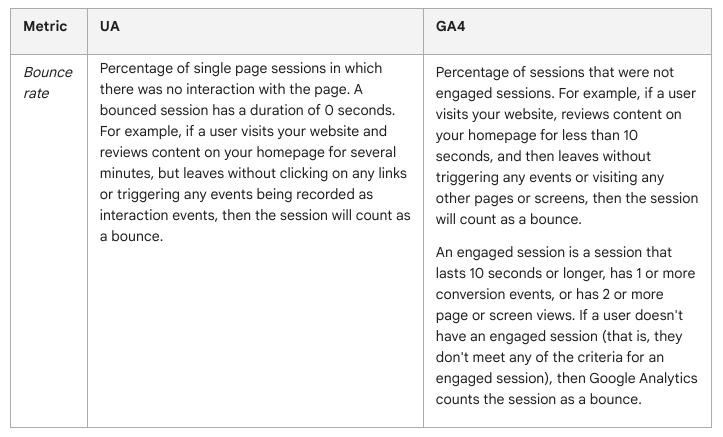
Bounces are measured differently in GA4. In the new platform, the bounce rate is the percentage of sessions that were not engaged sessions.
An engaged session in GA4 lasts 10 seconds or more, has one or more conversion events or has two or more page or screen views.
If a user doesn’t meet any of the criteria listed, then it is considered a bounce.
Contrast that with the traditional bounce rate in UA, which measured if someone only visited one page on a website and didn’t trigger any other event.
Conversions
Those who are used to tracking goals in UA will need to get familiar with conversion events in GA4.
In GA4, you will identify a key event important to your business. Once that event is hooked up on your website, it can be promoted to a conversion event inside of GA4.
Depending on how your goals are set up in UA, you may get a close equivalent in GA4.
But Google notes that there are some differences between UA and GA4 that may make it difficult to do an apples-to-apples comparison:
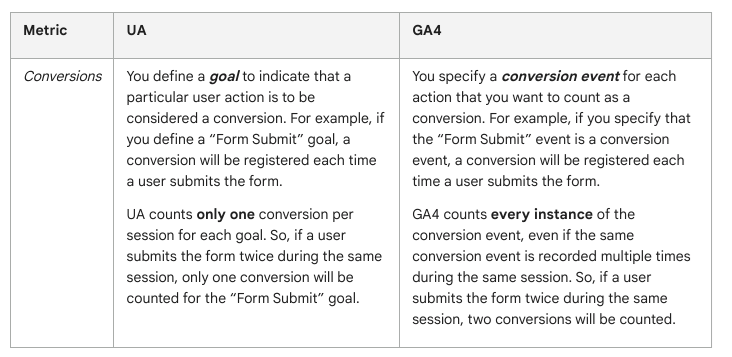
Universal Analytics supports five goal types: destination, duration, pages/session, smart goals, and event goals. GA4, in contrast, only supports conversion events. It may not always be possible to use GA4 conversion events to precisely duplicate some UA goal types. For example, it’s not possible to duplicate a smart or duration goal using GA4 conversion events.
UA counts only one conversion per session for the same goal. GA4 counts multiple conversions per session for the same conversion event.
Your UA reports may be excluding data based on view filters.
You can find out more on how to set up a conversion in GA here.
Ways to Get Started with GA4
Let’s go over a high-level overview of how to get going with GA4.
Google outlines three ways to get started with GA4:
- If you’re a new analytics user (meaning you have not used Google Analytics in the past on a website or app).
- If you’re already a Google Universal Analytics user. This option will use your pre-existing UA tag to populate data into your new GA4 property. The GA4 Setup Assistant helps with this step.
- If you’re adding GA4 to a website builder platform, such as WordPress, Wix, Shopify, etc. This is how you get and input the new GA4 measurement ID into your platform.
To encourage people through the process, Google provides an outline overview of how to make the switch to GA4, with labels that show how much effort is involved in each step.
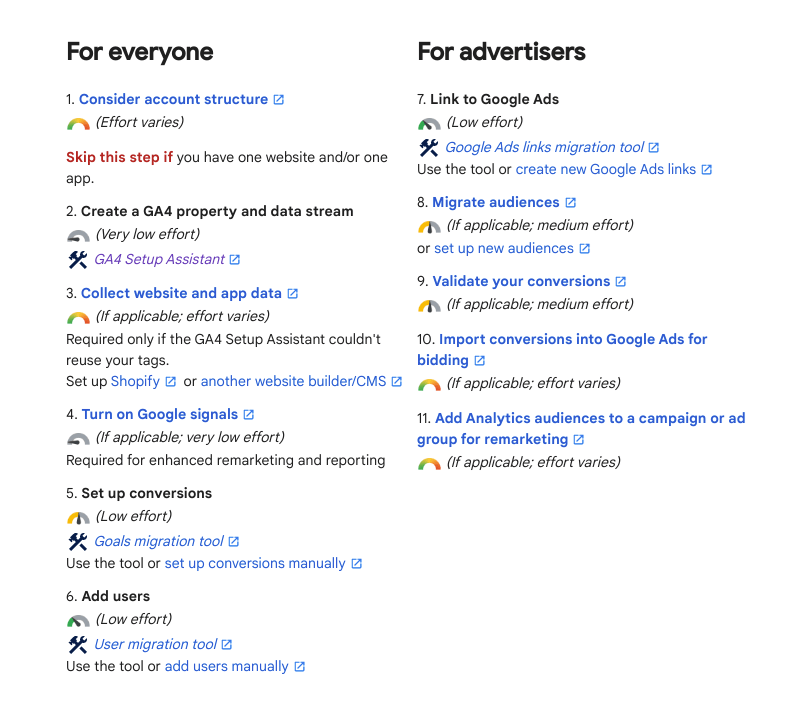
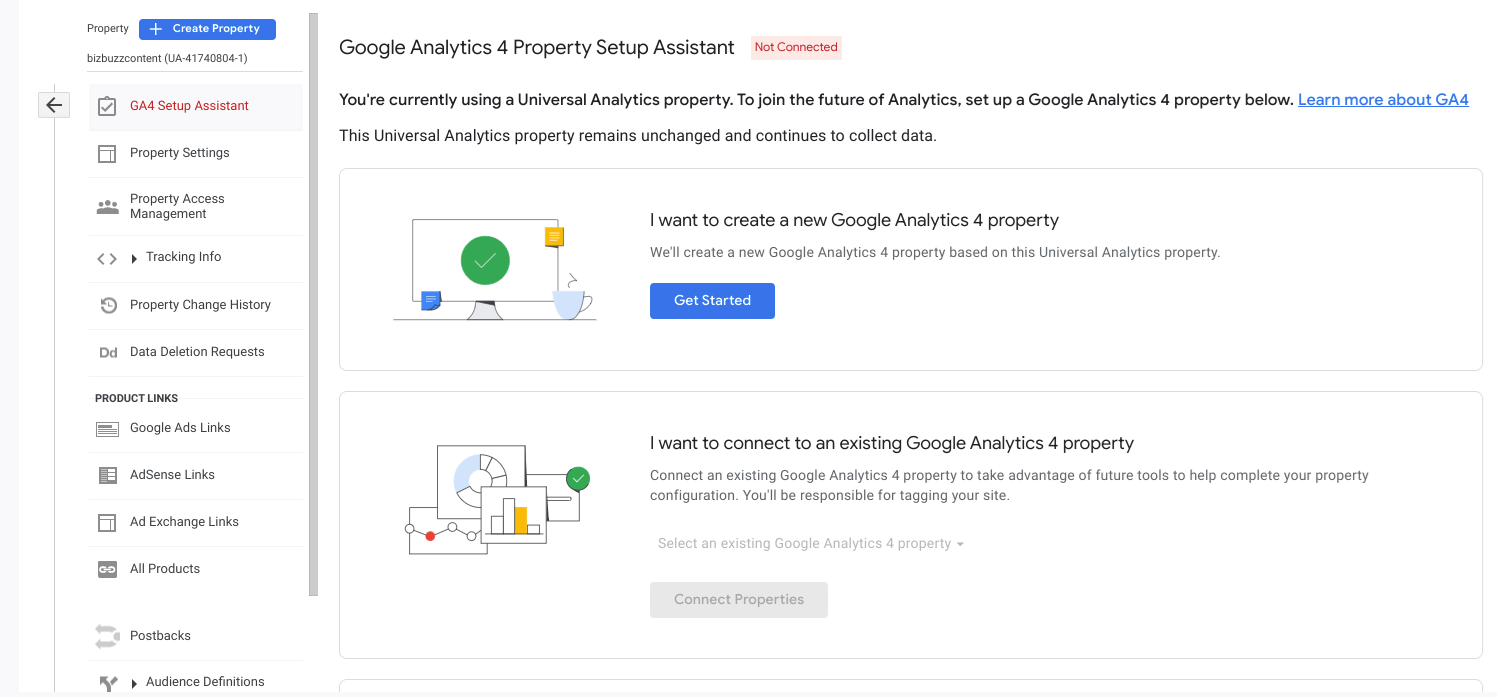
The Setup Assistant (from Google):
- Creates your new GA4 property.
- Copies the property name, website URL, timezone, and currency settings from your Universal Analytics property.
- Activates enhanced measurement in your GA4 property.
- Creates a connection between your Universal Analytics and GA4 properties. This connection makes it possible for you to use Setup Assistant in your Google Analytics 4 property to migrate configurations from your Universal Analytics property to your GA4 property.
- Sets the GA4 property to receive data from your existing Google tag, if you choose to reuse an existing site tag.
The GA4 Setup Assistant wizard does not backfill your new GA4 property with historical data. Your GA4 property only collects data going forward. To see historical data, use the reports in your Universal Analytics property.
A word of warning before you get started: Google has already sent out emails to Google Analytics users that they would be automatically migrated to GA4 starting the first week in March 2023 if they hadn’t already completed the process.
(Check out: Google’s GA4 Auto Migration: Here’s Why You Should Opt Out at Search Engine Land for a good overview on this topic.)
That means, for some, that Google will have already configured a GA4 property with basic settings.
You will want to check to see where you stand before proceeding. And you will most definitely want to ensure that the settings made for you are, in fact, what you wanted.
Verifying and Customizing Your GA4 Install
Once you have installed GA4, you will want to verify the install and customize settings as needed.
Verifying the Install
You can test the GA4 install by using the GA4 Tag Assistant Chrome extension or the GA4 DeBugView.
You can verify that the tracking code is properly sending data to the GA4 account by heading to Reports > Realtime to see that the data is loading.
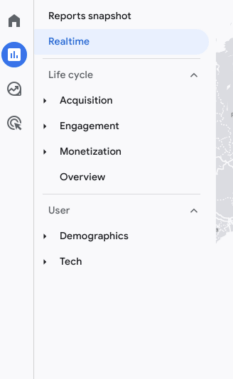
As with any system, you need to check often to ensure that data is being collected and processed correctly, and that the GA4 website is properly configured. Validate the installation and operation of GA4 on a regular basis – at least once a week.
Address any issues identified during validation as soon as possible to ensure accurate data collection.
At this point the system is installed and gathering data. Wait at least a day or two before you can see meaningful data coming in.
Customizing the Settings
Using the GA4 Setup Assistant, you can configure your property settings.
This includes:
- Turning on Google signals.
- Setting up conversions.
- Defining audiences, including recreating audiences from UA.
- Managing users.

Conversions: The Setup Assistant can migrate goals from UA to conversions in GA4 for you, but you should still review them to make sure they’re correct. The migration isn’t always perfect. Go to Admin > Property Settings > Conversions to verify.
Custom dimensions and metrics: Custom dimensions and metrics can be created by defining their name and scope and assigning them to the relevant data stream. Go to Admin > Property > Custom definitions to modify.
Take note: Unrelated to any particular settings in the Setup Assistant, you should be aware of any data protection laws and regulations that may apply to your website and ensure compliance. GA4 should be compliant out of the box, but any extra data you capture may not be.
So make sure that you are not storing any information about a user that isn’t spelled out in your privacy policy, and that your privacy policy is compliant with whatever laws you are subject to (GDPR, CPRA or something else).
Getting Started with GA4 if You Don’t Have UA or Google Tag Manager
The following section is helpful for those who don’t already have a pre-existing UA account and/or don’t use Google Tag Manager, nor have the help of a CMS to install GA4. Follow the steps in this section to get started with GA4.
The following section is helpful for those who don’t already have a pre-existing UA account and/or don’t use Google Tag Manager, nor have the help of a CMS to install GA4.
Follow the steps in this section to get started with GA4.
Step 1: Create a GA4 Account and Get the Tracking Code
- Go to the Google Analytics website (analytics.google.com) and sign in with your Google credentials.
- Click the “Admin” button (bottom left corner of the page).
- Under the “Property” section, click the “+ Create Property” button.
- Select “Web” as the type of property you want to create.
- Enter a name and default URL for your website.
- Accept the terms and conditions (read them first, of course 😊), and click on the “Create” button.
- Once your property is created, then click on the “Data Streams” tab.
- Click Add Stream > Web and fill out the form with your website details.
- Click “Create Stream” to create the data stream.
- Once created, under “Data Streams”, click on the stream you created and you will see your GA4 Measurement ID – it will start with “G-“.
- Get and copy the tracking code by clicking “Get Tag Instructions” and “Install Manually,” then paste it into the header of your website.
- Once you have added the tracking code to your website, you can verify that it is working by using the GA4 Tag Assistant Chrome extension or the GA4 DeBugView.
Step 2: Install the Tracking Code on the Website
- Make sure you set up the GA4 account and tracking code (see previous section).
- This is where you add the GA4 code to all pages/templates on your site – and add it to all pages but only once per page.
- Save the changes to your server if necessary – usually a webmaster task.
- Verify that the tracking code has been installed across your website correctly.
- In your GA4 account under Data Streams, you should link your website to your GA4 account.
- Wait up to 48 hours after installing the GA4 tracking code to verify that data is coming in for your website.
- Check the “Realtime” report under the “Reporting” tab to see if data is being received in near real-time.
- Check the “Audience” report under the “Reporting” tab to see if the data is showing users and sessions.
- Use the GA4 Tag Assistant Chrome extension to verify that the GA4 tracking code is installed correctly and working properly.
- Use the GA4 DeBugView to troubleshoot any potential issues with the tracking code installation.
- Check your GA4 account’s data settings to make sure that data collection is turned on and that the correct data stream is selected.
- Make sure you are aware of any data protection laws and regulations in your area and that your website is compliant with them.
Step 3: Configure GA4 Conversions and Custom Dimensions
- Login to your GA4 account.
- Click on the “Admin” link (bottom left corner).
- Under the “Property” section, select the website that you want to configure.
- Select “Events” from the menu and click “Create Event,” then click “Create.”
- Give the event a name and fill out its conditions. This can either be a fired event on the website or a “page_view” event for a certain page.
- Click “Create” in the upper right.
- Back on the list of Events, find the event you created and toggle the entry to “Mark as conversion.”
- In the Property menu, go to “Custom Definitions” and set up custom dimensions and metrics by defining their name and scope.
- Monitor your GA4 account’s settings and make tweaks as needed.
Step 4: Monitor the GA4 Account for Data Accuracy
- Calendar your frequent check-ins to review the data in your GA4 account.
- Use the Realtime report to see any unusual spikes or drops in website traffic.
- Compare data to identify any trends or patterns.
- Use segments to analyze specific subsets of your data.
- Use the GA4’s machine learning features to identify trends and segments in your data.
- Use the GA4 DeBugView to troubleshoot any potential issues with the tracking code installation.
- To ensure data accuracy, check it all and maybe adjust filters, custom dimensions, or goals.
Get Started Now
With GA4 deadlines looming for Universal Analytics users, it’s important to start the process of setting up GA4 right away. While you are doing this, you may still reference UA data until you make the switch.
Migrating to GA4 is a big change, but the insights you’ll get into your customer lifecycle will be well worth it.
Get Your Free GA4 E-Book
We’ve packaged all of this information into a handy 20-page e-book that you can save and refer to over and over. Get your free copy of Google Analytics 4: What It Is and How To Get Started today!
Inundated with SEO data and unsure how to apply what it is telling you? Our SEO experts can help you make sense of it all, plus give recommendations to implement in your program that gets better results. Contact us for a free consultation.
FAQ: How do I migrate to Google Analytics 4 (GA4) from Universal Analytics, and what are the key differences between the two platforms?
As the landscape of digital analytics evolves, migrating from Universal Analytics to Google Analytics 4 (GA4) is becoming increasingly essential. GA4 is more than an upgrade of Universal Analytics; it’s an entirely reimagined platform designed to meet the unique needs of website owners. This whitepaper will assist in your migration process and understanding any differences between both platforms.
Understanding the Key Differences
The first step in migrating to GA4 is understanding the fundamental differences between the two analytics platforms. While Universal Analytics is anchored in the desktop web and relies on cookies for data collection, GA4 operates across platforms and employs an event-based data model. This shift in approach allows GA4 to provide more user-centric measurement and better adapt to a changing digital ecosystem.
Migrating to GA4: Step-by-Step Guide
- Create a new GA4 property: Start by logging into your Google Analytics account and navigating to the Admin section. Click “Create Property”, then “Web” for the type of property that you would like to create. Follow the instructions to set up your new GA4 property.
- Add GA4 tracking code to your website: Once your GA4 property is created, you will receive a Measurement ID starting with “G-.” Add the GA4 tracking code to all pages of your website’s header.
- Verify the installation: Use tools like GA4 Tag Assistant Chrome extension or GA4 DeBugView to ensure that the tracking code is sending data to your GA4 account correctly.
- Set up data streams: Under the “Data Streams” tab in your GA4 property, click on “Add Stream” and select “Web.” Fill out the necessary details to create a data stream for your website.
- Configure conversion events: Identify key events important to your business and mark them as conversions in GA4. Review and adjust them to ensure accurate tracking.
- Manage custom dimensions and metrics: Set up custom dimensions and metrics by defining their names and scope. This will help you collect more specific data for your analysis.
- Enable enhanced measurement: Activate enhanced measurement in your GA4 property to access more detailed insights about user interactions.
Data Model Differences
One of the major differences between Universal Analytics and GA4 is the shift from sessions to events. In GA4, every interaction on your website or app is recorded as an event, providing a more granular view of user behavior. While this change may require rethinking your data collection strategy, it offers deeper insights into user journeys across different channels.
Metrics Updates
GA4 introduces changes in metrics like sessions, engagement rate, and conversions. Sessions are now counted differently, without a midnight cutoff, which may affect session counts. The engagement rate now considers engaged sessions lasting 10 seconds or more, or those with conversion events or multiple page views. Conversions are now represented by conversion events, which may not always duplicate the same goals as Universal Analytics.
Tips for a Smooth Migration
- Plan ahead: Before starting the migration process, thoroughly plan and understand your analytics goals to ensure a seamless transition.
- Backup data: Save a copy of your Universal Analytics data for reference and comparison during and after the migration.
- Review reports and data accuracy: After the migration, review GA4 reports, and cross-check data accuracy to ensure a smooth transition.
- Stay informed: Keep yourself updated with GA4’s latest features and changes to leverage its full potential.
Step-by-Step Migration Procedure:
- Sign into your Google Analytics account.
- Navigate to the Admin section.
- Click on “Create Property.”
- Select “Web” as the type of property.
- Enter your name and the default URL for your website.
- Click “Accept” when asked about the terms and conditions.
- Click “Create.”
- Click “Data Streams.”
- Click “Add Stream” > “Web.”
- Fill out the form with your website details.
- Click “Create Stream” to create the data stream.
- Under “Data Streams,” click on the stream you created.
- Find your GA4 Measurement ID starting with “G-.”
- Get and copy the tracking code.
- Add the tracking code to the header of your website.
- Use tools like GA4 Tag Assistant or DeBugView to verify the installation.
- Set up conversion events and custom dimensions.
- Enable enhanced measurement.
- Monitor data accuracy and make necessary adjustments.
- Stay informed about GA4 updates and features for ongoing optimization.
26,000+ professionals, marketers and SEOs read the Bruce Clay Blog
Subscribe now for free to get:
- Expert SEO insights from the "Father of SEO."
- Proven SEO strategies to optimize website performance.
- SEO advice to earn more website traffic, higher search ranking and increased revenue.

One Reply to “Google Analytics 4: What It Is and How To Get Started”
GA4 has more interesting reports. Thank you for giving me more information in this article.
LEAVE A REPLY


